Bitcoin, introduced by Satoshi Nakamoto in 2009, operates on a decentralized network of nodes crucial for network integrity. A Bitcoin node, also known as a full node, is pivotal in this ecosystem, fulfilling tasks such as validating transactions, relaying information, and maintaining the blockchain ledger. Bitcoin Core, the reference implementation of the Bitcoin protocol, not only facilitates running a Bitcoin node but also provides features like wallet functionality and a graphical user interface.
This guide walks you through installing and configuring a Bitcoin node on CentOS 7. By following these steps, you’ll establish your node, contributing to network decentralization and deepening your understanding of Bitcoin’s technology.
Prerequisites
Before proceeding, ensure you have:
- A CentOS 7 server with root or sudo privileges
- Internet reachable from the machine
- Basic Linux knowledge
By meeting these prerequisites and following the subsequent steps, you’ll set up a fully functional Bitcoin node, enhancing the Bitcoin network’s robustness and security
The installation process involves several key steps, including:
STEP 1: Updating and Upgrading System Packages
Make sure your operating system packages are up-to-date:
sudo apt update -y
sudo apt upgrade -y

STEP 2: Adding EPEL Repository
Bitcoin requires a few libraries that are not provided by the default CentOS package repository. We could build these libraries from EPEL.
Installing EPEL repository for downloading necessary packages:
yum install epel-release -y

To verify, listing the repositories”
ls /etc/yum.repos.d/

STEP 3: Installing Dependencies and Libraries
yum install wget git unzip autoconf automake boost-devel libdb4-devel gcc-c++ git libdb4-cxx libdb4-cxx-devel libdb4-utils openssl-devel libevent-devel libtool openssl-devel -y

wget: (Command-line file downloader)
git: (Version control system for tracking code changes)
unzip: (utility for extracting files from ZIP archives)
autoconf and automake: (Tools for preparing code for compilation)
boost-devel: (Development package for Boost C++ Libraries)
libdb4-devel gcc-c++ git libdb4-cxx libdb4-cxx-devel libdb4-utils: (Packages for Berkeley DB version 4)
gcc-c++: (GNU Compiler collection for C ++)
openssl-devel: (Development package for OpenSSL)
libevent-devel: (Development package for libevent)
libtool: (Script for managing shared libraries)
Verify the All the Libraries and Dependencies are installed:
rpm -q wget git unzip autoconf automake boost-devel libdb4-devel gcc-c++ git libdb4-cxx libdb4-cxx-devel libdb4-utils openssl-devel libevent-devel libtool openssl-devel

STEP 4: Download Bitcoin Core
You can download the latest version of Bitcoin Core from the official websites or clone the GitHub repository.
Creating Directory for proper management:
mkdir /bitcoin
Changing directory:
cd /bitcoin
Downloading Bitcoin core- version 0.20.0 for CentOS 7 compatibility; visit https://bitcoincore.org/bin/ for the latest releases
wget https://bitcoin.org/bin/bitcoin-core-0.20.0/bitcoin-0.20.0-x86_64-linux-gnu.tar.gz

STEP 5: Extracting Bitcoin Core
Extract the downloaded Bitcoin Core archive!
tar -xvf bitcoin-0.20.0-x86_64-linux-gnu.tar.gz

STEP 6: Installing Biting Core
Move the extracted binaries to the “/usr/local/bin” directory to install Bitcoin Core.
To list the file and directories:
ls
Moving files to install Bitcoin Core:
mv bitcoin-26.0/bin/* /usr/local/bin/

Verifying the installation:
bitcoind –version
bitcoin-cli –version

STEP 7: Configuring Bitcoin Node
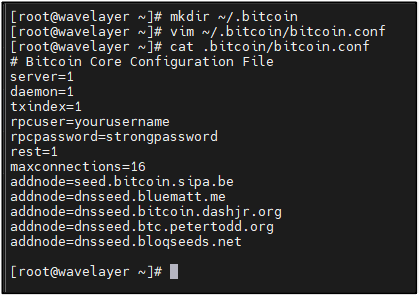
Creating hidden directory to store data and configuration:
mkdir ~/.bitcoin
Creating Bitcoin Configuration file:
vim ~/.bitcoin/bitcoin.conf

server=1 and daemon=1: Enable server mode and run Bitcoin Core as a background process.
txindex=1: Enable transaction indexing for faster transaction lookups.
rpcuser=yourusername: Sets the username for RPC authentication.
rpcpassword=strongpassword: Sets the password for RPC authentication.
rest=1: Enables the REST interface for HTTP server.
maxconnections=16: Sets the maximum number of network connections.
addnode=seed.bitcoin.sipa.be: Adds a known Bitcoin network node.
addnode=dnsseed.bluematt.me: Adds another known Bitcoin network node.
addnode=dnsseed.bitcoin.dashjr.org: Adds another known Bitcoin network node.
addnode=dnsseed.btc.petertodd.org: Adds another known Bitcoin network node.
addnode=dnsseed.bloqseeds.net: Adds another known Bitcoin network node.
addnode=dnsseed.emzy.de: Adds another known Bitcoin network node.
STEP 8: Start Bitcoin Core
Starting Bitcoin daemon to begin syncing with network:
bitcoind -daemon

Note: If you can’t find the “bitcoind” command in the shell, follow this!
ls /usr/local/bin

Appends the directory to the existing PATH environment variable:
export PATH=$PATH:/usr/local/bin/

STEP 9: Verifying the Configuration
Check the Bitcoin Core logs or use following command to ensure that the configuration changes have been applied.
Retrieve network-related information from a Bitcoin node:
bitcoin-cli getnetworkinfo

The output confirms that the Bitcoin node is operational and connected to the network with seven active connections. It also provides information about network protocols, relay fees, and network reachability, indicating that the node is functioning correctly.
STEP 10: Verify Node Status
Retrieve information about the Bitcoin node’s status:
bitcoin-cli -getinfo

STEP 11: Configure Firewall Rules (optional)
Allowing 8333 port:
firewall-cmd –permanent –add-port=8333/tcp
Allowing 18333 port:
firewall-cmd –permanent –add-port=18333/tcp
Reloading firewall:
firewall-cmd –reload

Note: These commands configure the firewall to allow incoming connections on ports 8333 (mainnet) and 18333 (testnet) for Bitcoin network communication,
Conclusion
In conclusion, the successful connection of the Bitcoin node using bitcoin-cli -getinfo reveals that the node is functioning as expected. The node has synchronized with the Bitcoin network up to a specific block, maintains active connections with other nodes, and is operating on the main Bitcoin blockchain. Additionally, the node’s balance, transaction fee settings, and other relevant parameters are displayed. This demonstrates the proper configuration and operation of the Bitcoin node, ensuring its participation in the decentralized network and facilitating various blockchain-related tasks.


